2019年1月29日星期二

Lonsdor K518ISE Program Seat Leon 3Fr MQB 2014 Key Success

New test report:
Seat Leon 3Fr MQB 35XX 2014 successfully programmed by Lonsdor K518 key programmer in 3-4 minutes.
Seat-Leon-3Fr-MQB-2014-Lonsdor-k518
customer have only one working key
It is clasic flip key, no keyless
if your car have johson control instrument cluster, K518 is not supported..I failed in a Octavia 3.

2019年1月26日星期六

How to Self-test with GM Tech2 CANDi module?

The power light on the CANdi module doesn’t come on when connected to the GM Tech2 .If that’s what you mean mine does not light up either. I think they should flash when linked to the car’s computer as that means the CANdi module is communicating. Bosch instructions:
12
GM Tech2 CANdi User’s Guide:
P/N 08002749 03/07 ©2007 Robert Bosch LLC, U.S.A. All rights reserved.

The Controller Area Network Diagnostic Interface (CANdi)  is an in-cable module that works with the existing Tech 2 components including the VCI, cables, and adapters.

Installed, the CANdi module is fully backward compatible with current tester functionality. The module powers up in a way that makes it transparent to the user. That is, unless the Tech 2 enables features specific to the CANdi module, all signal lines function as they do without the

CANdi module. This allows the existing Tech 2 software to be used with no changes, whether or not the CANdi module is installed.

The primary function of the CANdi module is to add CAN capability to the Tech 2 tester. The following list summarizes the basic characteristics of the CANdi module:

Supports simultaneous communications on three CAN buses

Provides high speed UART communications with the Tech 2


The Tech 2 commands the CANdi module operation.

When installed, the CANdi module does not interfere with any diagnostic procedure currently performed using the Tech 2. The usage of a CANdi module does not require any physical changes to the Tech 2, its cables, or adapters. The module operates in transparent mode until awakened by the Tech 2. Upon initialization, the CANdi module operates under master control of the Tech 2. All functionality is determined by the Tech 2 application software which is loaded on the Tech 2’s program card. The CANdi module always operates in slave mode to the Tech 2, responding in high speed SAE J1708 to the tester.

Physical Interface and LED CANdi connects to the Tech 2 by way of the existing Data Link Connector (DLC) Burndy Connector. The vehicle side connection remains unchanged using the existing adapter to interface between the Burndy connector and the SAE J1962 connector. When functioning properly, CANdi’s LED flashes. In the event of a problem, the LED will be constantly illuminated.

Warranty and Technical Service

Included with your system is a Warranty Card that must be submitted to Vetronix for activation of the two-year warranty. For technical assistance, please contact Vetronix Tech Support at (800) 321-4889 ext. 2.

Good to know: The Candi Module should not plugged into your GM Tech2 unless your working on a later car ..generally 2005 plus. Olders car from 96 should NOT have the Candi Module attached.

Images: How to do CANDi self test with Tech2?
13
14
15
16
17
18
19
20
21
22
23
24
25
26

2019年1月13日星期日

GM scan tools for SPS programming

Just information for you to make a wise purchase of GM scan tools for SPS programming: (here, I focus on SPS GDS2 on Abrites j2534 and GM MDI)
In the past ( few years ago when I bought my AVDI)
When I bought my tool I used Global Tis v32 and was able to do SPS Programming in my Y20DTH that I have at my desk for tests. All went OK.
After a while during a year of AMS I received the new drivers but because I didn’t like how the AVDI is working and because I make some money using it I dece to upgrade to genuine OEM tool for the brands that AVDI can work.
After a while I bought a genuine MDI.
And after years I did the tests because my friend who has a issue doing SPS Programming. And he asked me to check if its ok at me. And using same ecu that I did SPS Programming alright in the past then now was blocked. So I did and had the same issues as him.
He because has the AMS he received the new drivers after he talked with Abrites company.
For me AVDI its did it job long time ago and I don’t need to buy a new AMS. So I am using when I do what “she” can do.
My friend asked Abrites to fix this issue and they sent to him new drivers versions and then he could do a SPS Programming as well.
But take care this is not working in any ecu.
So my advise for you is to buy a good GM MDI but not VXDIAG VCX NANO and you will be fine.
In my opinion for GM cars and if you wanna do SPS Programming and diagnostics using Tech2win and GDS2 the better is a GM MDI – a genuine or good clone one, or a cheaper cable like a genuine or good clone Mongoose GM Pro2
Or a J2534 tool that its approved by GM.
Maybe for diagnostic AVDI is still good but for programming it will not for sure. But if you wish it you can use it and when you will block first ecu you will remember my opinion.
AVDI I hadn’t used anymore for diagnostic so I cannot tell you if its ok to use it in newer car with GDS2. Actually I have no new drivers for a long.
I just want to show you my experience and tell you my opinion. The decision is yours.
The last, two very important charts for you – might help your purchase
Abrites-AVDI-or-GM-MDI
That is,
If you want to do ECU programming or SPS programming, you’d better have a GM MDI interface with Global TIS.
If you need program new keys (only online with GDS2 and Tech2win), it depends.
If you have a new car or pickup truck after the year 2010, you have 3 options: MDI interface, Mangoose cable, Nano;
If you have an old car or pickup truck, you have one more option, Tech 2. That is, 4 options for the old GM vehicles: MDI, Mangoose, Nano and Tech 2.
If you want to have a diagnostic test on GM vehicles, you can have any tool with GDS2 or Tech2win or TIS2000. Clearly, all tools above can be used for GM diagnosis.

2019年1月1日星期二

GM SPS Programming: Tech2 Tool Remote Mode ECU TIS2000 Calibration Update

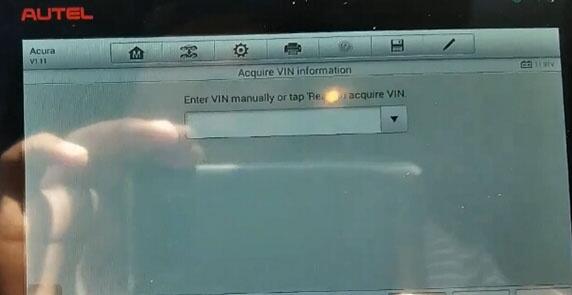
Here is the step-by-step instruction on programming GM (General Motors) ECUs with Tech 2 Scanner and SPS (Service Programming System) application in TIS2000.
NOTE:
Before using the SPS, make sure that the Tech 2 scan tool and the pc contain the latest software, the battery of the vehicle is fully charged, only the ignition is on power, and all cables are connected properly. TIS2000 will not work on 2007 up GM, and software must work together with TIS2000 USB key. If you need to program Saab ECU, you had to use Saab TIS2000 and USB dongle.
Main steps:
Step 1: Instruction for TIS2000 software
Step 2: Data request
Step 3: Data exchange
Step 4: Program ECU
Alternative Programming with “Pass Thru”
Check Programming result
Step 1: Instruction for TIS2000 software
1.Connect the Tech II to the pc.
Note: The hardware key (HWK) has to be registered prior to working with ‘Service Programming System’. To register a hardware key, the form that is enclosed with the hardware key kit has to be filled in and sent to the address at the top. In case the form is missing, the document is also in the TIS 2000 newsletter (see icon in the TIS 2000 tool bar). At first, the user receives a temporary code until the key is registered on the next TIS 2000 CD.
Hardware keys that have already been registered are still valid!
To register the hardware key select ‘Hardware Key Registration’ in the menu ‘Configuration’.
TIS2000 installation video guide
*   Start TIS 2000 on the pc.
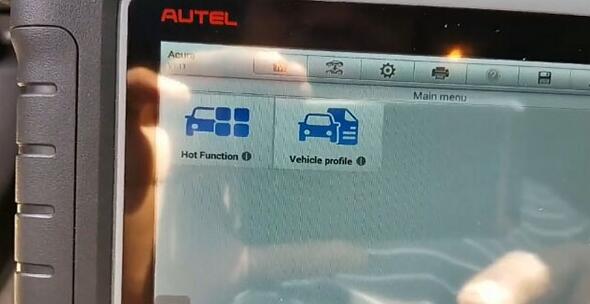
*   Select the application ‘Service Programming System’ on the TIS 2000 start page.
Tech2-program-ecu-with-sps-in-tis2000-1
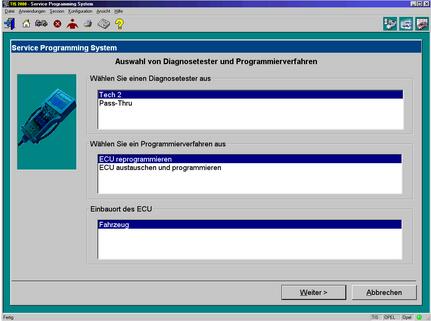
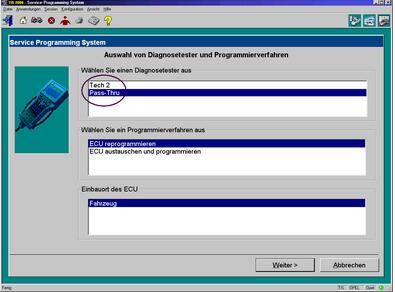
4. On ‘Select Diagnostic Tool and Programming Process’ (picture below) screen make the desired selection for
1) the used Tech2 diagnostic tool
2) the reprogramming of an ECU that was not exchanged or the replacement/programming of a new ECU
3) the ECU location.
Tech2-program-ecu-with-sps-in-tis2000-2
*   Click “Next” button to continue.
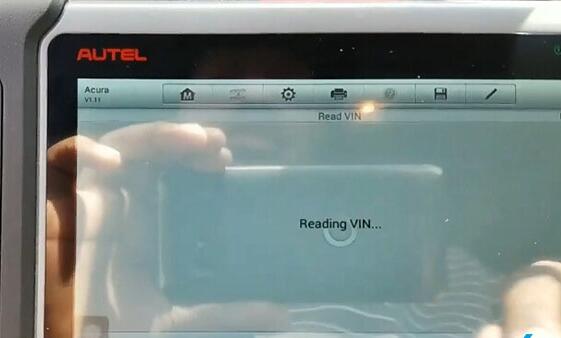
Step 2: Data Request
*   Connect Tech 2 scanner to vehicle. Power on device – “Tech 2” is displayed on the screen, then press “ENTER”.
*   Turn ignition to ON without start the engine!!!
*   Select “F1: Service Programming System (SPS)” in the main menu.
*   Press “F0: Request Info” on Tech 2.
*   If Tech 2 has already stored vehicle data they will be displayed now. In that case, Tech 2 asks you to either use the current data (hold data) or request further information from the ECU (continue).
*   For the selection of “Next” the vehicle has to be identified as requested by Tech 2.
Note: Depending on the model year and the selected model either a reprogramming of the ECU (F0: Engine) or of the TCM (F1: Transmission) can be selected.
*   During the Request Info the Professional Diagnostic Tool information from the selected device. If the ECU was replaced a “Request Info” has to be performed for the NEW unit. Since the new ECU is not programmed on delivery, the retrieved information is not complete. For that reason, TIS 2000 gives instructions as how to enter the missing vehicle data.
*   Follow the instructions on the Tech 2 on OBD2TOOL. Then press “Exit” on the Tech 2, switch it off and disconnect it from the vehicle.
Step 3: Data exchange
*   Connect Tech 2 to the pc, switch it on, and click on ‘Next’ on the pc.
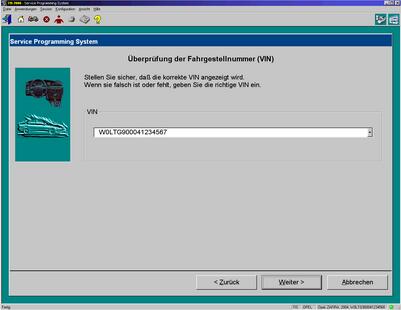
*   Confirm VIN or, if necessary, enter correct VIN, then select ‘Next’.
Tech2-program-ecu-with-sps-in-tis2000-3
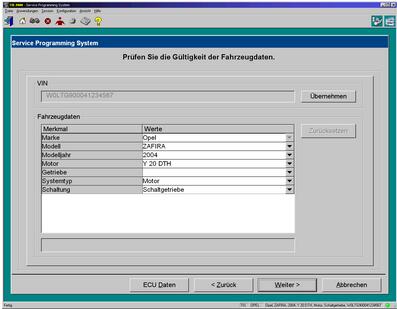
*   Validate vehicle data and, if necessary, change with the pull-down menus.
*   Click on ‘Next’. Button
Tech2-program-ecu-with-sps-in-tis2000-4
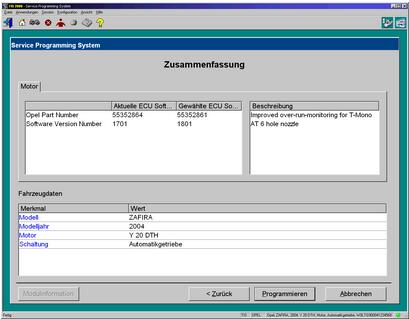
*   A new window displays a “Summary” (follow below) with the selected data. Continue with ‘Next’. Select “Reprog” button to download the latest calibration data onto the TechII diagnostic tool.
Note: It is not possible to reprogram an ECU with the same software version.
Tech2-program-ecu-with-sps-in-tis2000-5
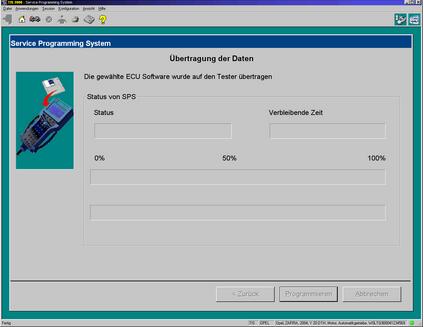
*   The window ‘Transfer Data’ is displayed. A bar shows the progress of the download.
At the end of the download, a window is displayed with the request to connect the Tech 2 to the vehicle in order to finish the programming process.
Tech2-program-ecu-with-sps-in-tis2000-6
*   After the closing of the SPS application the TIS 2000 start screen is again displayed. Finally, switch off the Tech 2 and disconnect it from the pc.
Step 4: Program ECU
*   Connect Tech 2 to the vehicle.
*   Switch on Tech 2 – start screen appears.
*   Turn ignition (Do not start motor!).
*   Press “Enter” in the Tech 2 start screen.
*   Select “F1: Service Programming System” in the main menu and then “F1: Program ECU”.
*   Follow the instructions on the Tech 2 screen.
*   During the download the Tech 2 screen shows the message “Programming in Progress”.
*   At the end of the download the Tech 2 shows the message “Programming was successful”. The button “Exit” leaves the program. First, turn off the ignition of the vehicle, then switch off the Tech 2 and disconnect it from the vehicle.
*   Turn off ignition for 30 seconds before starting the motor. Additional information is available in the section “Check programming”.
Alternative Programming with “Pass Thru”
In addition to the procedure described above, there is an alternative programming mode called “Pass Thru”. In that case, the data are directly downloaded from the pc to the ECU in the vehicle.
Although the Tech 2 is still needed in that mode, the data entry and the download control is done directly at the pc. Altogether, that method is faster, and it is recommended when a pc with TIS 2000 is within 3m of the vehicle.
*   Connect Tech 2 to the vehicle.
*   Connect Tech 2 to the PC switch on Tech 2.
*   Start TIS 2000 on the PC.
*   Select the icon ‘Service Programming System’ (Fig. 1) on the TIS 2000 start page.
*   Start TIS 2000 on the PC.
*   On the screen ‘Select Diagnostic Tool and Programming Process’ (See picture below) make a selection for
***Pass-Thru mode
***the reprogramming of an ECU that was not exchanged or the replacement/programming of a new ECU
***the ECU location.
Then clock ‘Next’ button.
Tech2-program-ecu-with-sps-in-tis2000-7
Check programming result
After every repgrogramming of an ECU a test to check the successful programming has to perform as follows:
*   turn off ignition
*   wait for at least 30 seconds
*   start motor to confirm the successful programming
*   If the motor doesn’t start this points at an error. After the replacement of an ECU it has to be made sure that the necessary programming of the immobilizer was successful.

2018年12月23日星期日

Customer real experience with GM Tech 2 Scanner

Here is the real experience by our customer Mr.Gary Richardson on GM Tech 2 Scanner.
Bought the highest quality version as i didn’t want to risk any issues with the device, and it all works fine and i do not regret my purchase.
It arrived pretty fast, but i got a £17 customs charge which i didn’t realise i’d get.
First impression: the carry case is not the one shown in the photo’s, which is annoying as the one in the photo’s looks really good, With the cables and candi module stored underneath 2 flaps, the main unit and adaptors clipping in the top of the case etc.
What i got was a basic plastic case (with sharp metal catches) where everything is squashed in on one level in foam, it does the job i guess, but i’d really have prefered the better case i thought i was paying the extra £30 for.
I’d bought a genuine Ugreen rs232 to usb cable in advance, £10 off amazon, this is one of the few cables listed as working with the tech2, and it did, connects at highest speed with no issues at all.
The house power supply has an american plug on it (psu has a universal voltage of 100 to 250 volts)
i got worried when the tech2 wouldn’t even turn on, then i noticed the plug had slightly pulled out of the adaptor i had to use, something we are not used to in england as our plugs fit the sockets very securely and are hard to accidentally pull out, so changing the plug is one of the first things to do…
The house psu runs pretty warm btw.
I did all the self tests and it passed them all with flying colours (except the usual HBCC test that gets ignored (used on some ford vehicles i believe) and the RS485 that has no loopback adaptor so will always fail)
I took it out to my car (a 2011 vauxhall meriva B) and plugged it in, it connected straight away and i asked it to give me a list of DTC’s, i had been using an op-com before i got the Tech2 and the tech2 listed some old DTC’s the op-com had never picked up, I cleared the DTC’s, then tried the rest of the diagnostics available, i had no problems so far, i was able to move engine actuators (op-com can’t do that on the meriva B) operate things remotely, saw the DPF was at 108% full, so went for a little drive and the tech2 showed the DPF regen in progress, got an exhaust temp of 650 degrees C during it)
However that test drive showed up the universal weakness of the clone tech2’s, the internal power supply cuts out when you start the engine so the tech2 re-boots, this means there are a few diagnostic tests you can never do that involve starting the engine whilst the tech2 monitors things (unless you use external power to the tech2, which is advised against in all service manuals)
There is a solution, replace the internal power supply module with a better quality unit!!
There is also a highly recommended modification of removing the RS232 chip and putting a usb module in it’s place so you have a direct USB connection to the tech2, rather than the 4 connections that are just begging to be caught and pulled apart whilst uploading software to the car.
These mods are on the tech2 wiki (google it)
I then tried to SPS to my car to add a new IPC… one of the reasons i bought the Tech2.
That’s when discovered my car is not in the list of cars you use the tech2 to service program directly (the: connect tech2 to car, download data, take tech2 to computer, upload data, download software update, take tech2 back to car and upload the software method)
But i figured i could SPS using the tech2 in the J2534 pass thru mode… only my computer couldn’t connect to the tech2 in that mode… remote view of the unit worked but not SPS… i figured the issue out tho…
The rs232 to usb adapter had been assigned to com port 7 when i plugged it in, i changed the com port to COM1
~windows / computer / device manager / ports (COM & LPT) and find the relevant port your rs232 adapter is on (it wont be listed as ‘Tech2′) and change it to port 1~
Now SPS in pass thru mode works perfectly, i updated the software in a few of the modules (i use GlobalTis 32b, the last offline version with full SPS capability, was released in 2012 i believe, and it had newer software than my 2011 car had in it)
Then i did an update of the BCM and IPC to allow the rain sensor i’d just wired in to be seen by the systems, I tried to add a new immobilizer key, but it refused the accept the new key, most likely the key is at fault.. as part of learning new keys is to delete the old ones from the system, and the tech2 added them back no problem.
I’ve also used the Professional Diagnostic Tool tech2 to connect to ford vehicles using some software called ‘ForScan’ it has the Tech2 listed as a J2534 pass thru devise and works fine with it, The pcmcia card that came with the Tech2 allowed it’s self to be re-written (some people buying from other places find the card is locked and can’t be re-written)
i used GlobalTis’s card writer feature, it takes 40 minutes to write the card, but it works fine.
I’m very pleased with my Tech2 so far, the only thing that would make it perfect would be the carry case that’s shown in the photo’s, but that dosent affect how the actual devise works.
I’d recommend anyone buy their Tech2 from this obd2tool.com, and i have pointed a few people who were interested in buying one here.
Thanks to Mr.Gary Richardson for his Experience sharing.

2018年12月16日星期日

Normal Star Diagnosis vs Developer Mode

Look here: Where exactly the differences between the normal Star Diagnosis and the Developer Version lie?
Since these differences depend on the DVD version, you will get this nowhere reliable information. The Dev version contains features that are not always released for service and are therefore not available on the “normal” versions of SD. Without another license key there is nothing.
Also, some of the HW and software version of the built-in controller depends. Here are the web many halbgare information to read.
The difference is just the license key.
Other key: More rights and possibilities. For example, there are pure car licenses (Smart, MB …) but also full licenses, with which you can read and work on all Daimler products. In the service, the computers are online, that is, it is not possible to operate a computer easily with a different license
So really a developer tool is not it but that’s why … No one works with us, because we use something completely different. Not so pretty, but much more powerful and flexible than the MB Star C4. But also much error-prone, which one must avoid in the service by all means.
Also, Developermode is available in Xentry. There are a few more things you can do.
But from BR 204/212 etc Sense anyway with big what to do, because everything online. But also gives information on the Internet.
Offline SCN coding mW also with tricks normal but in practice gabs still no success, especially since no need is pending.
This Vediamo should but according to opinions of other specs probably be a good software …
Update:
Quoted:
“This Vediamo should but according to opinions of other specs probably be a good software … let’s see if something can be found.”
This is a pure development tool. The “normal” skilled worker or master in the branch can do almost nothing with it.
Without knowing which “commands” to execute in a particular order, garnix happens.
Did it “coincidentally” but managed to adjust ANYWHERE, ….. yes, and then ??? How do you get that back when things are not going as expected?
So without the expertise of the ECU supervisor, you have no chance.
And even the stupidest …. the necessary description files are there are not
many here in the forum are not even clear with the serial diagnosis, and that is in comparison to children’s stuff.

2018年12月9日星期日

Autel MX808 Immo Function Confirmed! Add New Keys to Honda

Tested successfully!
Today, we Obd2tool.com engineers has confirmed the immobilizer function of Autel MaxiCheck MX808
! 100% tested on a Honda Acura and it’s working.
3 steps made it.
Step 1: Add a new key
Step 2: Check the key registered
Step 3: Test the new key
In detail…
The new key (2+1 button) to be programmed
autel-mx808-key-programming-1
The dashboard status: on
autel-mx808-key-programming-2
The door status: open
autel-mx808-key-programming-3
In Autel MK808 scanner:
Auto selection…reading vin automatically
autel-mx808-key-programming-4
autel-mx808-key-programming-5
autel-mx808-key-programming-6
Car: Honda – Acura – USA
autel-mx808-key-programming-7
Hot function
autel-mx808-key-programming-8
Keep ignition on until the tester directs you to turn the ignition off
autel-mx808-key-programming-9
The tester cannot program keys with a T5 stamped on the blade of the key or with the world ILCO on the plastic head. These keys can only be programmed with the ILCO key duplicator
autel-mx808-key-programming-10
Establishing vehicle communication…
autel-mx808-key-programming-11
Autel Scanner MX808 starts to add a key
Add and delete keys – Add a key
autel-mx808-key-programming-12
autel-mx808-key-programming-14
Turn the ignition switch off within 17s
autel-mx808-key-programming-15
Turn the ignition switch to on with a new key within 20s
autel-mx808-key-programming-16
autel-mx808-key-programming-17
Turn the ignition switch off within 17s
autel-mx808-key-programming-18
Turn the ignition switch to on within 20s, without changing the key
autel-mx808-key-programming-19
Turn the ignition switch off and on
autel-mx808-key-programming-20
autel-mx808-key-programming-21
The immobilizer indicator light
autel-mx808-key-programming-22
autel-mx808-key-programming-23
Turn the ignition switch off
autel-mx808-key-programming-24
Turn the ignition switch to on with an original key
autel-mx808-key-programming-25
autel-mx808-key-programming-26
The registration of keys has been completed
Turn the ignition switch off
autel-mx808-key-programming-27
Check the key number
autel-mx808-key-programming-28
autel-mx808-key-programming-29
3 keys are registered
autel-mx808-key-programming-30
Test the new key
autel-mx808-key-programming-31
autel-mx808-key-programming-32
It’s working
Autel MX808 immo function is verified to work on Honda!